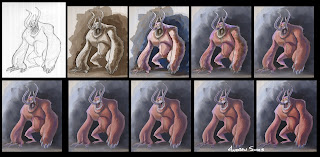
My friend Errol asked me how I went about the last painting, and after flubbing it trying to explain it entirely in words over the phone, I thought I'd put together this.
The process I took is a weird combination of Ryan Church and traditional oil painting, apparently. So I'll try my best to explain it clearly:
The brushes I used for it weren't any special, custom brushes (except for a minor one!) With the lineart opened in Painter, a new layer was created, set to 'gel'. From there, I started to lay in monochromatic washes with the broad water brush (found in digital watercolor), making sure that whenever it couldn't get any darker, I'd dry the layer, drop it, then make a new one to keep going until I got the right range of values I was looking for. This process was repeated probably 3, maybe 4 times in total.
Once that was done, a new layer was made, set to colorize. Here, I took the scratchboard tool (found in pens), and set the opacity to something like 15-20%. This when you can experiment with different color schemes and see what work in terms of temperatures and hues. Since this was the first one I tried this way, I used really saturated colors to make sure the colors came through, since the colorize layer is treated like a glaze almost.
After this, I only used four tools from here on out: an Eraser (I sometimes used a scratchboard variant that I turned into an eraser, but it's usually too hard of an edge at this point,) scratchboard tool (this time with opacity at 90-100%,) Artist's Oils Drybrush, and Artist's Oils Blending Brush. The Drybrush was the most used tool, and most of the gruntwork was done with that. The scratchboard tool was only used for small details, like making the teeth, refining some edges, and doing the swirls on the tusks and claws. The Blending brush didn't come in until way towards the end, when I need to smooth out value transitions in some areas and clean up the roughness of it all. At some point early on, I used the water rake (found in blenders) to smooth stuff out and also start to get the feel of fur going on, but it was the only time I had used it, and I probably could have skipped it altogether if I just kept blending and refining with the tools above.
Once it was finished up and posted on here, I thought it might have looked a little too even in values, so I took it into Photoshop and punched up the values using Curves.
Well, I think that answers all of that! Hope it wasn't too confusing, Errol!

No comments:
Post a Comment