Chuck asked me about how I go about doing my perspective work digitally, I thought I'd take some screenshots of Photoshop to explain exactly what I do, since just words will probably make it far more confusing. I'm also thinking of doing a future post that shows some analog perspective tricks, for the folk that sit more at the drawing table than the computer desk.
Anyway, let the screenshots flow forth! You'll probably need to click on them to view some details in a larger screen.
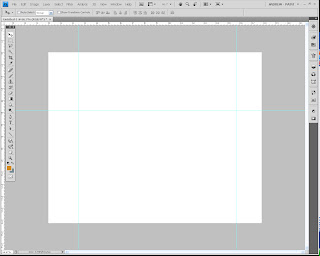
In your new document in Photoshop, enable Rulers (by going to View, show> Rulers.) From there, drag out some guides, you'll need at least three if you're doing two-point perspective (one to represent your horizon line, one to set as an anchor for your right vanishing point, one to set as your left.)
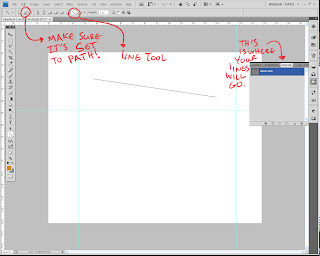
Once you have your guides laid out, click on View, and then select "Snap." Make sure the option for Snap to Guide is on, as this is how you'll make sure all your lines converge on the same point. For the sake of simplicity, I'd also make sure snap to grid is off.
Select the shape tool (I think it might also be called the polygon tool as well...) and change it to Line. Now, here's an important step, which I've highlighted in the screenshot: Make sure the option is set to Paths, and not shape. This prevents it from actually showing up on the canvas until you're actually ready (I should note that this version is CS4, so earlier versions might have this placed elsewhere. Refer to your help manual to see how your layout is set up, though if you're on CS3 it's probably the same.) Also note where you see the line show up: It's under a tab called Paths, which is usually grouped with the Layers and Channels tabs. Most likely, your line right now labeled as "Work Path."
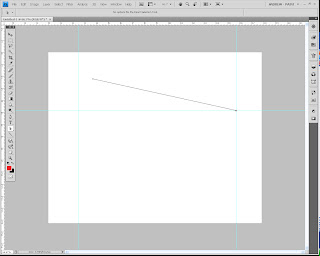
When I laid down the line earlier, I thought I had Snap turned on, but it turned out I didn't. So in this step, I selected the end point (I'll explain later how to do this) and dragged it to the right anchor point. It should snap into place where the two guide lines meet. Congrats! Your first perspective line is made.
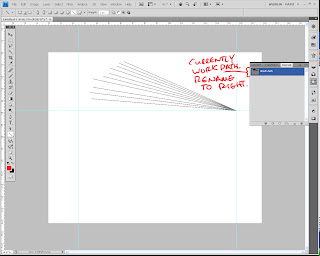 At this point, repeat the previous two (one if you had snap on and made it go to the anchor point first time through) steps to make as many more perspective lines as you want for the right vansishing point. Don't worry about making correct perspective, what we're doing is making a quick template that you can alter and change later. What you want right now is a bunch of lines that converge on the right anchor point. I'd try and make sure the other ends don't snap to any other guide points.
Once you've got a healthy amount (you can always add more later), double-click the name "work path", as if you were renaming a Layer. Incidentally, the name window pops up! This is how you save your path. If you left it as Work Path, next time you boot up PS, it'll disappear. Poof. Gone. Plus, we can't have the left and right VPs in one path selection (we could, but it gets messy.) So rename this one "Right VP" or "Right" or whatever else that will remind you that it's the right vanishing point.
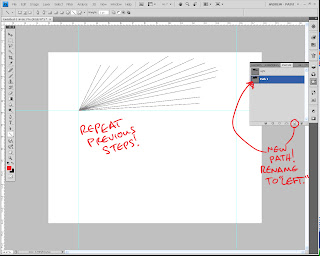 Now that you've gone and finished up the right vanishing point, it's time to do the left one. See the little button on the bottom, same place as where the button for "new Layer" is one the Layers tab? Click it, it creates a new path. Rename the path to be "Left V.P" or "Left." From there, repeat the steps you did to create the perspective lines for the Right V.P., but this time anchor them to the left point.
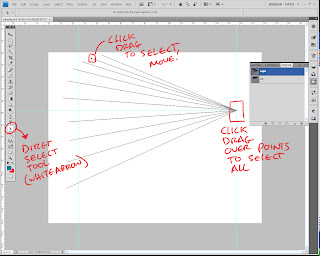 Okay, you've got both your V.P.'s lined and you're ready to make perspective. Using the Direct Selection tool (refer to the screenshot,) select end points to drag them around. I should note that even if you're selecting one line, you should do a Click-Drag method, since simply clicking on a point and moving it can create...problems. So just trust me on this. Pull out the lines to where you want them to be. This is also when you set up your V.P. in its correct position. Just click-drag to select all the end points on the V.P., then start dragging it around (you can take the time now to also adjust the guide if the Horizon line is too high up for you, or too low, etc.)
For the sake of this demo, I'm being really arbitrary about it, but of course in your own piece this is where you actually use all that knowledge you have of perspective to have CORRECT placement. I should also point out you can pull these lines well off the live area of the document, and they still show up, so you can gauge how far away you really need that V.P. Go ahead, try it, I'll wait.
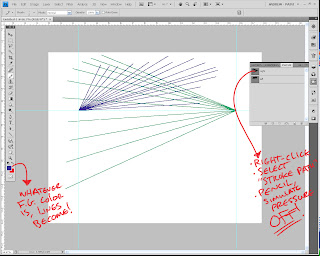 Finished? Good, because we're going to actually draw the perspective lines now. You see, the joy of Paths is that you can alter and change it before you actually decide to commit it to the page. Once you're ready though, here's what you do:
-Select for your foreground color the color you want to use for your perspective lines. I like to have each V.P. have a different color, but whatever doesn't confuse you, go for it.
-Select your pencil tool, and notch the size down to anywhere between 2-4 (you'll probably have to play with this, more in a bit.)
-create a new layer for your perspective
-Select the V.P. path you want to commit to the document.
-Right-click it, then select "stroke Path." Set it to Pencil, with "simulate pressure" OFF.
Voila! Your lines are now drawn on the page for one of your V.P.'s! Repeat these steps for the remaining ones, and your perspective grid is good to go for your drawing.
Regarding the Pencil Tool: you might have to do a few Ctrl+z's before you actually find the right size that works for the piece you're working on. Paths have a tendency to stroke a bit larger than what the tool actually does. So that brush size 4 may actually look like a 6 or an 8, just to give you an idea. Play around with it a bit.
I should also tell you that this works best for pieces that don't involve a Dutch Angle (titled view.) Anything that alters the horizon line from being a straight horizontal obviously can't use guides as the horizon line, but it is possible to still use this method (just some creative thinking will have to take place.)
Hope this helps out some folks, and of course, if you have any questions, feel free to ask away.

2 comments:
Hey Andrew, hope all is well. I just came across this: http://www.freddieart.com/QuickTools/Quicktools.htm and thought you might be interested. That guy has the new DC Comics Guide to Digital Drawing Comics that is coming out soon which I will be getting. http://tinyurl.com/djzfwt
Hi Chuck!
Man, attacking the old posts, huh?
Thanks for the link, I'm really curious to see the new DC book once it comes out (you're link is the first I heard of it.) I'll be VERY curious to see his section on inking, as that's something I've been experimenting with.
Post a Comment